Like many of you I wanted to try digital mode with my KX3. The most popular application being Fldigi. Even with my 25 years plus in the IT industry working with various software application, networking and industrial controls I still had quite a bit of problems setting up the radio to work with Fldigi. A recent FaceBook post by a fellow KX3 user who had the same issues I did showed me I was not the only one who had struggles setting this up. Even with a great guide by a fellow ham, K4MTX (
see his blog post here), he had the same struggles I did. For that reason, I thought I would put document the steps I took in setting my KX3 up with Fldigi.
The first thing is the cabling. First, I highly recommend you get the cable kit from Elecraft. It may be a little more money, but well worth it. Before even trying to cable up your KX3 to your computer/sound card
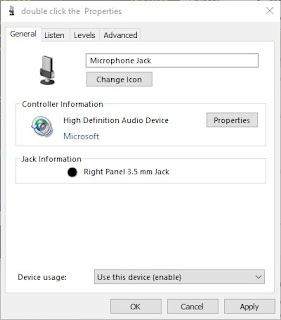
you need do the following. First, locate the headphone/speaker jack and microphone jack on your computer/sound card. This may sound very rudimentary but believe me, its easy to get them mixed up. Next, right click on the speaker icon on the system tray and click on recording devices. You may notice multiple recording devices/microphones. This is what tripped me up. Determine which one is your microphone jack. On most computers when you double click the microphone it will be the one that shows "jack information such as "right panel 3.5 mm jack." To make mine stand out and easy to find, I renamed it Microphone Jack.
Now, again, before you cable anything up you need to turn off the mic bias and mic button. To do this hold down the DISP button and the display should change to the configuration menus. Next, turn the OFS/VFO B knob until the menu changes to MICBIAS. Then use the VFO A know to change the setting to OFF. Then, using the OFS/VFO B knob change the menu to MIC BTN. If using the Elecraft MH3 this should be set to Ptt UP.dn. Use the VFO A knob to change this to OFF. Push the display button to save. If you do not do this you will start transmitting as soon as you plug in the cable to the mic port.
Since I switch over from SSB/CW to digital often I wrote macros to do this for me. You can assign them to the PF1 and PF2 buttons, use the KX3 Utility, or, like I do have them assigned to macros buttons in Win4k3. To go to digital mode i use the following:
MN135;MP000;MN082;MP000;MN255;
To go back to mic mode I use:
MN135;MP016;MN082;MP005;MN255;
Macro programming is outside the scope of this post, but its something you should look into. It can make repetitive tasks much easier.
OK, we can now cable it all up. The cables from Elecraft and marked with a green band and red band. I used the green band to go from the mic jack on the KX3 to the headphone jack of the computer. I then used the red cable to go from the speaker of the KX3 to the mic jack of the computer.

We also need to hook up the CAT control cable. Put the 3.5 mm end into the spot marked ACC1 and the USB side into an open port on your computer. Right click on the Windows start icon and chose device manager. Open up ports. If this is the only serial/USB device you have it will be the only one listed here. If you have multiple, unplug the KX3 from the computer and see which on disappears. That will be the Com port of your KX3.
The final step on the KX3 is to put it into DATA A mode. Do this by press the DATA button and then use the OFS/VFO B know to choose DATA A. This is very important. Make sure the filter on the KX3 is set wide open. I have my BW set at 3.0. IF you have it to narrow, you will not receive any data.
This setup should work with most digital modes.
We will go over setting up Fldigi for the KX3 on my next post.


 Once there click on the Devices tab. Click the Port Audio box. The capture device should be the microphone we identified in Part 1 and the Playback should be the speaker/headphone jack we identified in Part 1 as well. I've left all the other setting at default.
 The first thing is the cabling. First, I highly recommend you get the cable kit from Elecraft. It may be a little more money, but well worth it. Before even trying to cable up your KX3 to your computer/sound card
  We also need to hook up the CAT control cable. Put the 3.5 mm end into the spot marked ACC1 and the USB side into an open port on your computer. Right click on the Windows start icon and chose device manager. Open up ports. If this is the only serial/USB device you have it will be the only one listed here. If you have multiple, unplug the KX3 from the computer and see which on disappears. That will be the Com port of your KX3.